Turn Your Handout into a Video

You can make a simple video that pairs key information from a short handout with images using the free web-based tool Lumen5. You can edit the video components (the text on screen, how it appears, and the image shown). As you are moving course materials online, Lumen5 can be a quick way to add a visual element to your course materials.

An Example Handout and Video

The video below was created with the text from a webpage that explains my labor-based grading system and a tip-filled infographic on how to do well in the course. The result is the following video:


Video Transcript

The video took me about three hours, though most of that time was spent searching for appropriate, diverse images and for the background music. The result is far more interesting than a Zoom video allowing students to watch me read the information to them.

How to Create Your Own Video

The process is straightforward:

  1. Create a free login on the Lumen5 site.
  2. Use the Create Video button at the top of the dashboard page, which you reach after logging in.
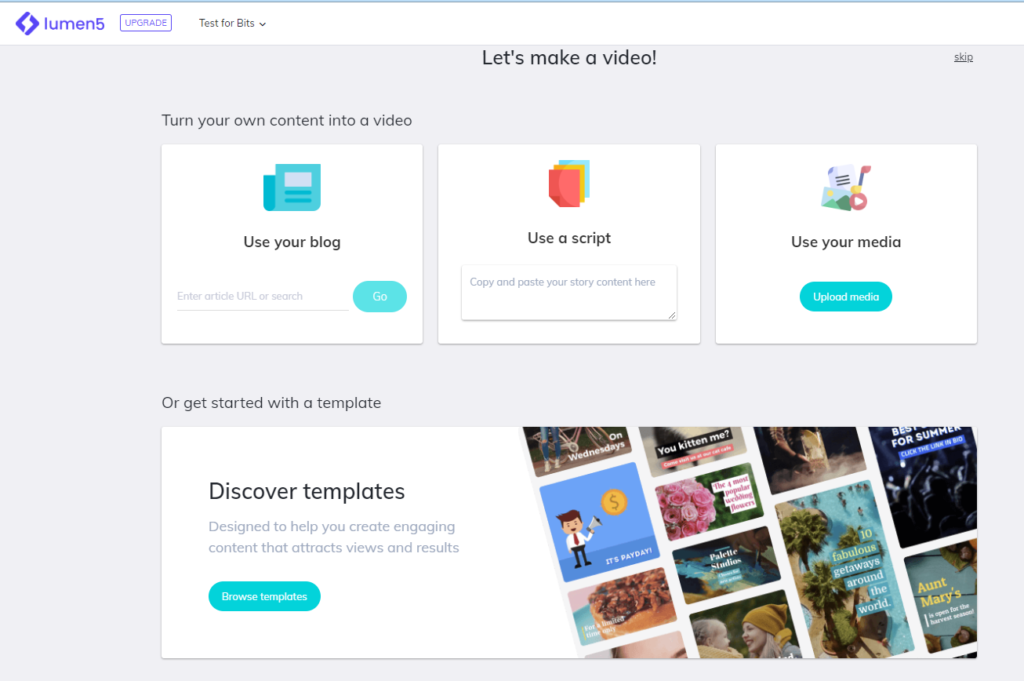
  3. Choose one of the available options (start with a blog post, paste in text script, use a media file, or begin with a template), as shown in the image below:
    Video Options in Lumen5 (start with a blog post, paste in text script, use a media file, or begin with a template)
  4. Provide the text for your video, following the on-screen prompts.
  5. Wait while Lumen5 uploads and processes your text, adding images and key phrases to the video slides.
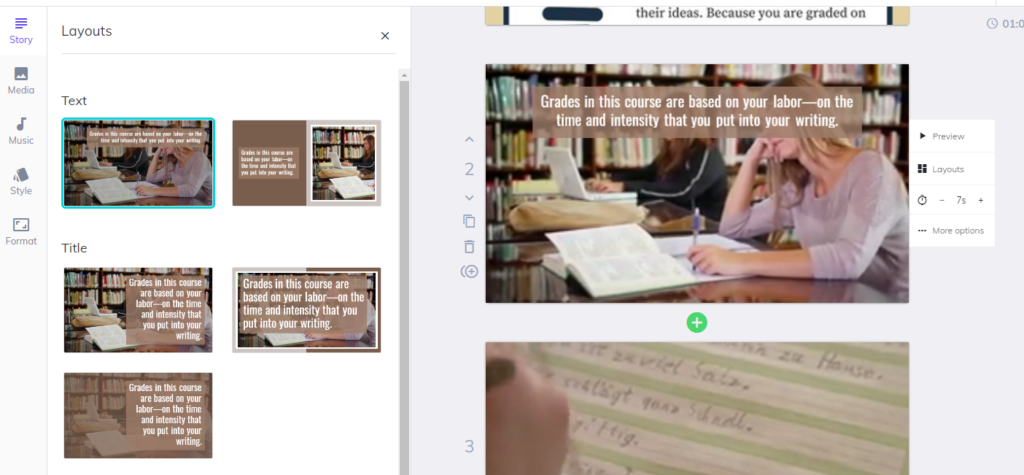
  6. Edit the slides as you wish, changing the placement of the text, editing the text, choosing new images, and changing the options for the images, all shown in the screenshot below:
    Lumen5 edit screen, showing different layout available and other options.
    Notice on the upper left that you can also choose different media, templates, and music for your video when you are editing.
  7. Click Publish when you are happy with everything, and the video will process and then prompt you to download.
  8. Share the completed video as you like–in your CMS, on YouTube, or elsewhere.

Last Updated on

This post was inspired by a piece written for Bedford Bits: Convert Handouts to Videos with Lumen5 and originally published on the Teaching Online 911 blog.

Ten Tips for Moving Your Class Online Quickly

You’re probably working away at moving your class online. Even with the extra week to prepare that some of us have been given, there are weeks of work ahead of us. We’ll all have to rethink activities, change things that aren’t working, and give up on some things that are beyond the possible right now.

Your work will be easier and more successful if you keep these ten tips in mind:

  1. Choose online tools you know. This is not the time to innovate. It is hard enough to migrate all your course materials online. Don’t add to your workload by choosing a new tool to do it. Whatever you’re using is good enough.
  2. Remember time zones matter–as do personal schedules. Students are no longer in the same place and time. They are spread all over the globe. Their time zones are different and their personal obligations are different. Asynchronous work (work that doesn’t require everyone to be online at the same moment) allows everyone in the course a fair opportunity.
  3. Keep it as simple as possible. The activities and expectations should be clear and straightforward. Break things out into smaller steps, rather than creating one larger activity. You’ll help students keep track of what they need to do when they can complete an activity in one sitting.
  4. Let students track their own work when they can. Ask students to keep track of how they are doing in the course. They can keep a log of what they have posted easily, for instance. All you have to do is review their logs. That’s much easier than you having to keep track of every thing that every student has done.
  5. Allow reasonable accommodations and exceptions for everyone. With the many additional demands and challenges we are facing, we can all use a little extra help right now. Give students who ask for more time an extra day. Allow students whatever they need, as long as it’s reasonable.
  6. Share accessible resources. There are students in your class who will not have the resources that they need. It may be their textbooks, class notes, or library books. If you can share PDFs or offer alternatives, do so. Students may have no other option if you cannot provide them an alternative.
  7. Be clear about your availability. When classes meet on campus, students know when they can find you. If all else fails, you’re about just before and after class meets. With classes online, students have no idea. Will a response to that urgent email message take a few hours or a few days? Be specific about when you are online and working so they don’t worry needlessly. For example, tell students something like “I am usually online and answering messages weekday afternoons, from 1 PM to 3 PM, Eastern.”
  8. Explain yourself. Tell students the reasons behind your choices and decisions for how the course proceeds. Don’t expect students to guess what you’re thinking or expecting. With all course interactions online, you can help things run much more smoothly by explaining logistics and other class decisions.
  9. Encourage students to help one another. Create a space in your course resources where they can ask one another for help. Whether the questions are about the course, Internet connectivity, or which grocery stores are open, students can help one another–and their effort will reduce your workload while building community.
  10. Give up on perfection and absolutes. Set reasonable expectations for yourself and your students. It would be nice to imagine there will be no Internet or software issues and that students have access to all the resources that they need. It’s not likely to happen that way however. Scale back your plans, allow for changes as needed, and have alternatives and back-up plans ready. You’ll thank yourself later.

Last Updated on
This post originally published on the Teaching Online 911 blog.

Set a Consistent Schedule

Every aspect of a college student’s life is in flux right now. All the familiar routines they are used to are changing because of COVID-19. One of the best things you can do is provide these students with a consistent schedule that they can rely on.

Why do these routines matter so much? There’s no way for a student to know when you will post something online. In the campus classroom, you probably hand out or share assignments, pass back or post graded work, and so forth. When classes move online, students no longer know when to expect these things to happen. Either students leave it to chance, hoping that they will notice when you post something or when work is due, or they spend every moment online refreshing class resources in an attempt to catch updates the moment they are posted. Neither of these options is ideal–and both can lead to a great deal of anxiety and stress.

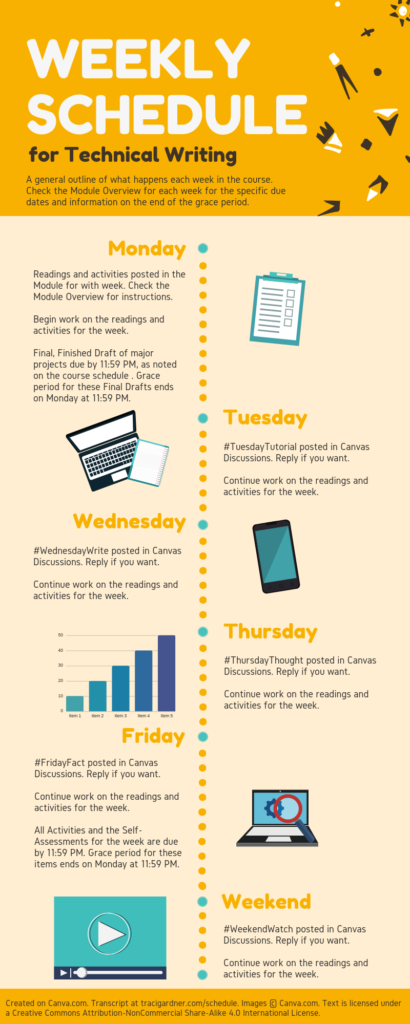
If you establish a regular schedule however, students know exactly what is supposed to happen when. I established a weekly schedule for the classes I teach entirely online, which I share using an inforgraphic similar to the one below:

Weekly Course Schedule, explained in the accompanying text

Because the schedule is an image, I provide a transcript as well, publishing the details from the image beside it. As you move to migrate your course online quickly, a table with the details will work just fine. Students will care about having the details more than how pretty the schedule is.

For your schedule, include as many days and as much information as necessary. For instance, if your course was meeting every Monday, Wednesday, and Friday, just include those days on your schedule. If your course runs on two-week units, go ahead and include two weeks in your schedule.

Keep in mind that this schedule is not a substitute for the class calendar. Its job is simply to outline the repeating structures that students can rely on each week. It’s a simple piece to add to the resources you share, but establishing consistency in this way can help students stay on try, especially at a time when COVID-19 seems to be disrupting everyone’s schedule.


Last Updated on
This post originally published on the Teaching Online 911 blog.

Preparing Students for Online Classes

Teaching completely online writing courses quickly taught me that students needed additional preparation and support in most cases. While students at my university are online often, they are not frequently online for academic purposes. Now, thanks to COVID-19, they are online for every course–and they are unlikely to be prepared for it.

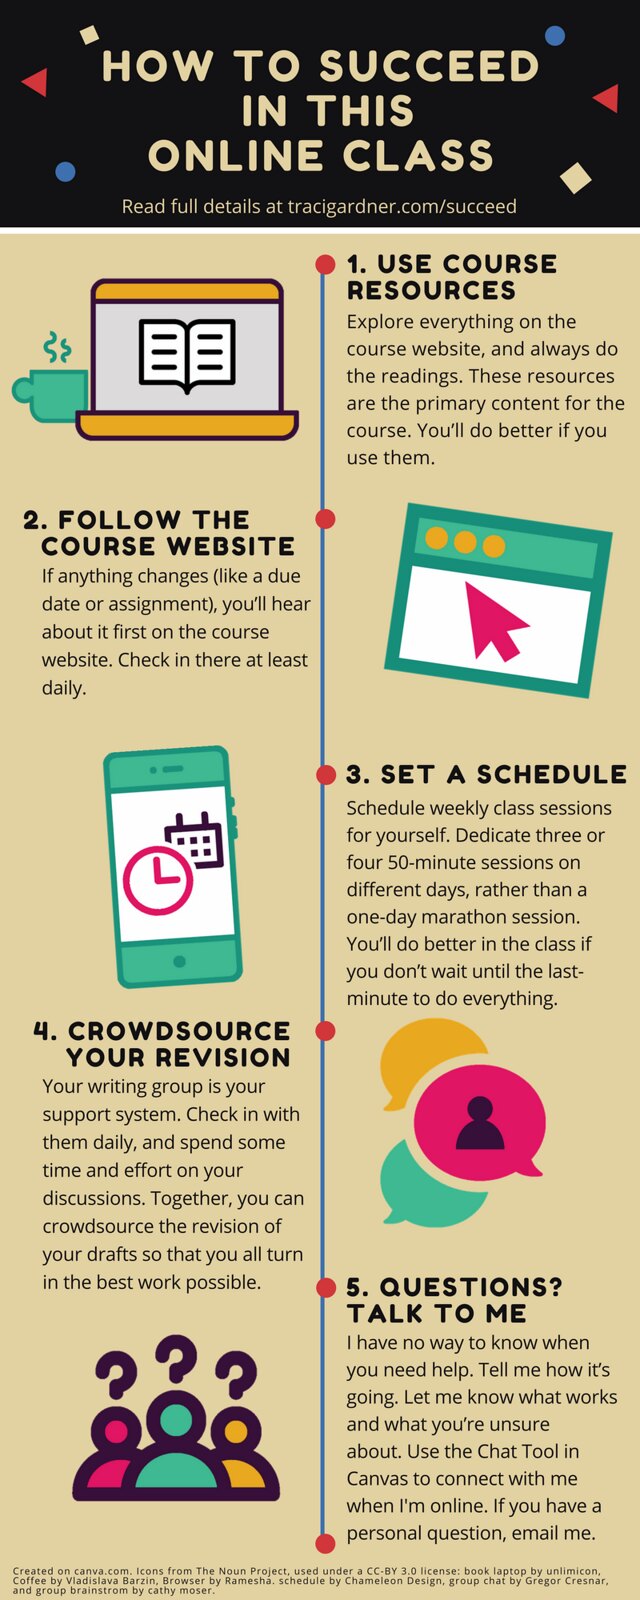
I made the infographic below to give students some quick things that they can do to make sure they are ready. I use it at the beginning of every term, along with other activities and resources.

How to Succeed in this Online Class

You can use the infographic as is, if it fits the needs of your course. Note that it does make reference to Canvas (our LMS at Virginia Tech). Download a copy from Flickr: https://flic.kr/p/DWAs78. It’s shared under a Creative Commons Attribution-NonCommercial Share-Alike 4.0 International License.

If you need to tweak the infographic to work for your course, visit the template on Canva (a drag-and-drop web-based design tool). You will need to create a free Canva login to customize the image.

If you do use the infographic, remember to also provide a transcript for students who cannot view the image. I handle this transcript by repeating the text beside the image itself, as you can see on this page from my current Technical Writing course.

This text version of the infographic gives you another option for sharing these ideas with the students you teach. You can also skip the infographic altogether, copy and customize the text from the transcript (linked above), and publish the resulting version with your other class resources.


Last Updated on
This post originally published on the Teaching Online 911 blog.

Teaching Online 911 Collection on Evernote

Sinking BoatAs everyone scrambles to support students in online classes, colleagues are sharing links to teaching tips, free online resources, and classroom activities.

I have found links in my Twitter Timeline, my Facebook Newsfeed, and my email inbox. Lots of links. Soooo many links.

Every time a new link shows up on my screen, I make a guilty mental note to go back and read it later, when I will surely have more time. But that miraculous blessing of “more time” still hasn’t appeared.

The links keep coming. When I click through, frequently I find even more links. There is an entire ocean of resources out there, and I’m over here bailing out a sinking dinghy. I just can’t keep up.

Not only am I overwhelmed with all these great resources, I’m anxious about missing or losing one of them. That one link I forget to return to will surely be the resource that solves the challenge I’m working on. I’m not sure how to remember all these great ideas, but one thing is clear: I need a way I can find these links later, before any more scroll off my screen.

Evernote to the Rescue!

I have set up a Teaching Online 911 Evernote notebook, filled with all these wonderful links. So far, it’s a great solution. The notebook has just over 40 links at this point, to webpages created recently to address the pandemic-driven need to move online and to established resources that offer good teaching advice for any situation when classes are taught online.

Whenever someone forwards a new resource, I use the Evernote Web Clipper (a browser plugin) to add it to my notebook. The clipper saves the title, a copy of the document, and its link. I published the notebook on the web, so I can share it with everyone.

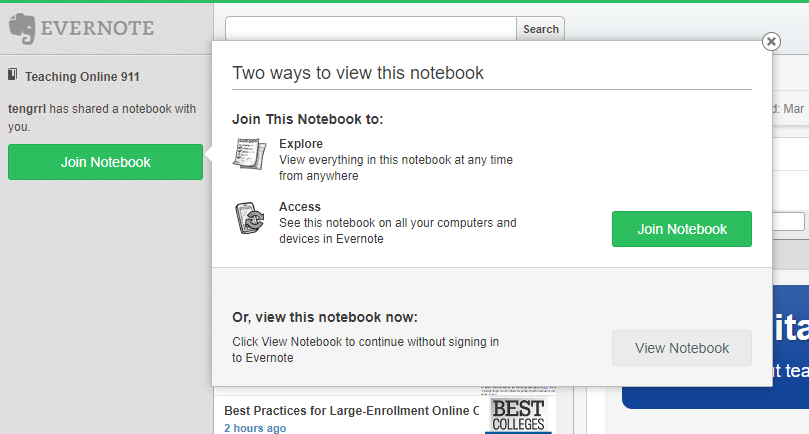
Visitors to the Teaching Online 911 notebook can either Join Notebook, to connect to their own Evernote login, or View Notebook, to see the notebook without loggin into Evernote. Both options are shows in the screenshot below:

Evernote Public Notebook screenshot, showing the Join or View options

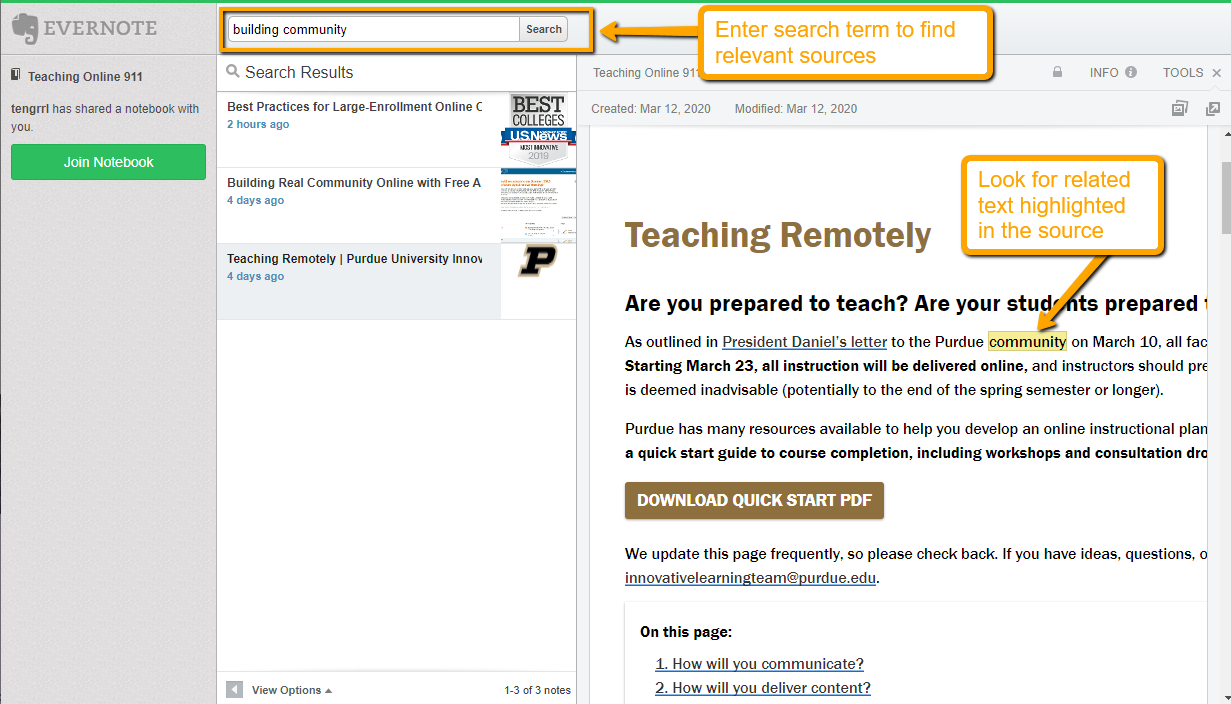
Because I have the clipper save a copy of the resources, anyone visiting the notebook can easily find resources that include relevant information. A search in Evernote checks for the search term in the saved copies and returns a list of found sources with the search term(s) highlighted. The screenshot below shows what such a search looks like.

Evernote Public Notebook screenshot, showing a search term and highlighted results

If you too are looking for solutions and inspiration, give the Teaching Online 911 notebook a try. I hope you’ll find something you can use as you move your courses online.

Photo credit: Sinking Boat by Rodrigo Amorim on Flickr, used under a CC-BY 2.0 license.


Last Updated on
This post originally published on the Teaching Online 911 blog.

Stop, Read, & Apply: Guided Revision Activities

Earlier this year, I participated in a conversation on collective feedback during a Faculty Office Hours session (an online chat for teachers of professional and technical writing). Collective feedback, a strategy examined by Lisa Melonçon (University of South Florida, @lmeloncon on Twitter) in a five-year study (see her resources online), provides the whole class with details on frequent errors found in the drafts for the course, replacing some, if not all, individual feedback on projects. The process gives the instructor the chance to review common errors with everyone, eliminating the duplication of explaining to each student individually.

Building on Melonçon’s research, Dr. Sara Doan (Kennesaw State, @SDoanut on Twitter) described an in-class activity that she uses to guide students through revision of their projects. She explained that she would tell to the class that she was going to review “Ten issues you all need to fix.” She then asked students to open a copy of their project on their computers. Once students were ready, Doan then stepped students through common errors that they should correct in their drafts. For example, she asked students, “Is your name the biggest thing on your résumé? If not, you need to fix it.”

I love this strategy. I have given students checklists and rubrics to use as they evaluate their drafts, but the same common errors persist. The challenge for me is that my classes are all online. I cannot gather students and ask them to all open their projects so I can walk them through revision strategies.

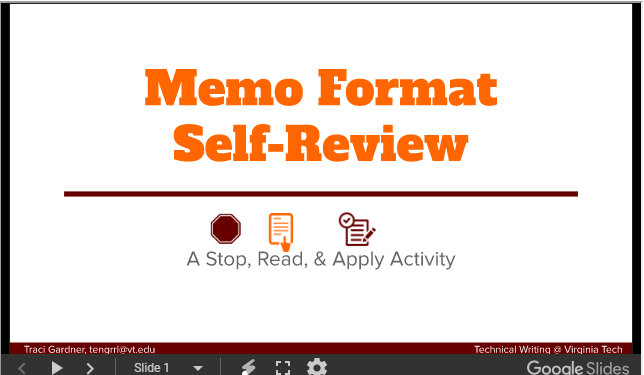
I created a Google Slides presentation (click on the screenshot below) to solve the problem, calling it a “Stop, Read, & Apply” activity.

Stop, Read, and Apply Slides screenshot. Click to view the slideshow.

The instructions essentially match those that Doan used: Students open their project, and then advance through the slides, stopping on each one to read the details on the common error and then apply that advice to their drafts. To focus students, the slideshow addresses only common errors in memo format. If the activity works, I will create similar slideshows for other common issues students can review as they finish their work.

Because the slides are online, I can also use them in feedback to students. All I have to do is open the Slides file in a new browser tab, advance the presentation to the slide I want to reference, and copy the link from the browser. For instance, I can link directly to the slide on eliminating opening greetings in a memo. So simple!

I hope that this slideshow-based system will slow students down, encouraging to check their drafts more carefully. Further, I can easily adapt it to any course and assignment I might teach. I am eager to see if the activity helps students address common errors. I’d love to hear your feedback on the strategy as well. What do you think? Would you use a similar resource in your courses? Are there “Stop, Read, & Apply” activities you would like to see in a future post? Leave a comment below and tell me what you think!

This post originally published on the Bedford Bits blog.

A Grace Period Update

Grace period catRecently, several colleagues have asked me about my grace period, which is part of my late policy on student work. Their interest encouraged me to write an update on how it’s been working.

I began using a grace period in 2013, and I’ve used it ever since. When we talk about students and their requests for extensions, someone usually talks about the number of family deaths that students mention in their requests for more time to get their work done. I’m happy to report the grace period means that I never read that kind of an extension requests. That’s right! No grandmothers are killed in my classes!

So how does the grace period work? Below is the statement that I include in my syllabus for the summer session. Canvas, which is mentioned in the policy, is our course management system (CMS):

Late Policy (Grace Period)

My late policy includes a grace period that should cover most problems that come up, whether academic conflicts, an illness, a religious holiday, or a personal issue. It applies to most graded work and can be used multiple times. You do not need to ask in advance or explain why your work is late. Just take advantage of the grace period, as explained below, for any work OTHER than your final exam:

  • The due date is the day that your work is due (usually Fridays). Every student has a 3-day grace period after the due date during which the project can still be submitted.

  • The grace period occurs between the due date and the deadline. Work submitted during the grace period will be marked as late in Canvas; however, there is no grade penalty for work submitted during the grace period.

  • The deadline comes 3 days after the due date (usually Mondays) and is the final moment that Canvas will accept a project (listed as the “available until” date in Canvas). There are no extensions on deadlines. If you do not turn in your work by the end of the grace period, you receive a zero for that activity, and you cannot revise. Unlimited, punishment-free revisions are NOT intended to support those who never did the work in the first place.

Final Exam: There is no grace period or make-up option for your final exam. Your final exam must be submitted by the due date (11:59 PM on Saturday, August 17) so that I can turn course grades in on time. If you have three exams on Saturday, August 17, let me know and we can make alternative arrangement.

Extenuating Circumstances: In the case of extenuating circumstances, let me know immediately. I understand that things happen. To pace course work for everyone, I will not post work early to resolve a conflict. If you let me know reasonably ahead of time, we can find a solution. As long as you are honest and timely in letting me know what’s going on, we can try to work something out.

Religious Holidays & Events

Please take advantage of the grace period explained in the Late Policy section above if the due date for any work in this class coincides with a religious holiday that you celebrate. Please let me know before the holiday if the grace period will not be adequate, and we will come up with an alternative plan.

I have learned a few lessons in the six years that I have used the Grace Period system. After some experimentation, I settled on three days as the length of the grace period. Longer grace periods interrupt progress on the work students need to do. At one point, I used a week-long grace period. Unfortunately when a student turns in a rough draft a week late, she can’t use any of the revision strategies we are talking about during the next week of the course. Three days seems to be just right.

I also learned to warn students not to use the grace period to procrastinate. We will begin working on the next project as soon as the due date passes. During the grace period then, students will end up working on two projects at once. If they procrastinate too much, they may be behind all term. I advise them at the beginning of the class to try to keep up with the due dates, and I remind them throughout the term to try to catch up if they do fall behind.

Others have described this system as humane and supportive. Those are great advantages to be sure. I’m selfish though. I created this policy for myself. I no longer have to weigh the believability of student excuses nor respond to those email messages asking for extensions. The grace period is one of the best policies I’ve made as a teacher.

Do you have a policy that has made a big difference in your teaching? I’d love to hear about it. Tell me in a comment below. I look forward to hearing about what works in your classroom.

This post originally published on the Bedford Bits blog.

Where to Find Public Domain Videos

Public Domain video from Library of Congress
Duck and Cover! by the Federal Civil Defense Administration

If you ask your students to create video projects, today’s post is for you. Showing students where to find public domain videos will give them thousands of free-to-use videos that they can clip or embed fully in their work. These resources exponentially increase their options beyond what they can gather by filming their own footage and using short clips from copyrighted material under Fair Use.

As I explained last month, Public Domain Assets have no copyright restrictions, so students can use these resources in their own work without worrying about permissions or take-down notices. All they need to do is cite their sources in an appropriate way. NASA’s Videos and Ultra Hi-Def Videos and the National Park Service, Multimedia Search from my last post, for instance, provide high-quality video footage that students can use freely in their projects.

Last week, I shared where to find public domain images, and in today’s post, I’m giving you details on some of the best public domain video resources available. These collections are arranged by the different kinds of resources that they offer, so students may find footage relevant to their subject areas at any of them.

Public Domain Search Sites and Collections

Prelinger Archive
This archive focuses on ephemeral films, which the site defines as advertising, educational, industrial, and amateur films. The collection includes a subset of home movies and has a variety of search filters that can help students find relevant footage for their projects.

Feature Films, from the Internet Archive Moving Image Archive
These public domain videos include feature films, short films, silent films, and trailers, such as the William Castle film House on Haunted Hill. The collection does include nudity (such as shorts featuring strippers) and graphic images (such as a U.S. Department of Defense film on Nazi Concentration Camps).

FedFlix, from the Internet Archive Moving Image Archive
A collection of videos from the U.S. government, this archive includes a variety of historical movies (like the Duck and Cover! video above) as well as movies related to such areas as the military, the FDA, and law enforcement.

U.S. Government Agencies, on YouTube
Many government agencies post their public domain videos on YouTube, making them widely accessible for student projects. Here are some examples that are worth sharing with students:

Students can embed videos from these collections into their projects, but they cannot download the videos without violating YouTube’s Terms of Service (unless the video has a download option).

Final Thoughts

If students are working on documentary projects or narrative projects, these public domain collections are likely to include resources that they can use. The ways that they can use the footage vary, so check the details on the sites to ensure that students abide by the policies of the collections they are interested in.

If you know of additional collections of public domain videos that are appropriate for student projects, please share them. The more resources available for students to use, the better! Just leave the details in a comment below. I look forward to hearing your experiences with using public domain resources in the classroom.

This post originally published on the Bedford Bits blog.

Where to Find Public Domain Resources

Illustration of Frederick Douglass
Public Domain Illustration of Frederick Douglass

In my last post, I shared details on Encouraging the Use of Public Domain Assets in student projects. Public domain images, video, text, and audio provide free-to-use, copyright-free resources that students can incorporate in any of their work, such as illustrating a pamphlet, creating a slideshow, or producing a video.

The public domain illustration of Frederick Douglass on the right, for instance, could be used in a student project, with details on its source in the Flickr collection of the Internet Archive Book Images as well as the illustration’s original source.

The challenge with public domain resources is knowing where to find them–and that’s my topic this week. I will share several subject-specific sites, and then I conclude with collections that cover a variety of topics. The sites I am sharing do include some video and audio resources, but the majority focus on images.

Public Domain Search Sites and Collections

The National Aeronautics and Space Administration (NASA)
As I mentioned last week, NASA is the ideal source for any student working on aviation, aeronautics, or space-related topics. The NASA website includes three different kinds of multimedia:

Because NASA is a government agency, all of NASA’s multimedia are usable within public domain permissions.

National Park Service
Students can find resources on historical locations, natural landscapes, and the inhabitants of those landscapes. The National Park Service, Multimedia Search can help students find such resources as photos of the Martin Luther King, Jr. Memorial and a video on Preserving the Historic Orchards at Manzanar National Historic Site (a WWII Japanese Internment Camp). The site includes photos, videos, audio, and webcam footage. Do remind students to check usage rights as they decide on resources to use. Most of the materials are in the public domain, but there are some exceptions.

U.S. Department of Agriculture (USDA)
The USDA Agricultural Research Service maintains an Image Gallery Search that includes photos related to subjects such as crops, animals, food, insects, and lab research. The USDA Agricultural Research site also includes a collection of videos, issued from 1996 to present. The videos focus on various research and news stories, such as this video of Honey Bees Tossing Out Varroa Mites.

National Oceanic and Atmospheric Administration (NOAA)
The collections in the NOAA Photo Library include all the images from the National Weather Service, highlighting both storm photos and unusual meteorological phenomena. The library also includes collections on Fisheries, Gulf of Mexico Marine Debris, and national marine sanctuaries.

Flickr Resources
Many governmental agencies have collections on Flickr, and you can quickly find them by visiting the USA.gov Group Photostream. The group combines the photostreams of official U.S. federal, state, and local governments on Flickr, with collections from groups ranging from the U.S. Corps of Engineers to the Peace Corps.

The Commons on Flickr is an international group of cultural institutions that provide public domain images, such as the Smithsonian Institution on Flickr and the British Library on Flickr. The group includes museums, historical societies, religious archives, and university collections.

Wikipedia Public Domain Resources
Wikipedia uses public domain images on many of the entries on the site. As a result, Wikipedia maintains a list of Public domain image resources. The dozens of sites listed repeat some of the resources above (such as the British Library on Flickr), but they also include sites that organize images from other collections. While the sites above are all reputable and reliable, the sites on the Wikipedia page may not be. If you recommend this page to students, spend some time talking about how to evaluate Internet resources.

Final Thoughts

In addition to knowing where to find public domain resources, students need to know how to cite the resources they include in their projects. I talk about documentation before students even begin their search for assets to help ensure they avoid citation errors. To my way of thinking, reminding students to gather citation details for a photo is just like reminding them to write down the page number for a book quotation they plan to use.

This week’s links favor photos and illustrations that can contribute to any multimedia project. There are times when students will want to go beyond still images however, so I will share collections that focus on video footage in my next post. Until then, let me know if these sites are useful or share some of your own favorite public domain sources. Just leave me a comment below. I can’t wait to hear from you.

Image credit: Illustration of Frederick Douglass from Internet Archive Book Images, used under public domain.

This post originally published on the Bedford Bits blog.
Encouraging the Use of Public Domain Assets

Photo of Earth from space, showig the North American Continent

Image credit: NASA

If your students are creating projects that include images, video, and audio, public domain resources can contribute to amazing work that avoids many of the headaches of using copyright-protected assets. Since public domain assets are free of copyright protections, students can freely incorporate them into their projects without asking for permission or evaluating them for fair use.

Here’s an example: If a student needs an image of Earth for a project, going to the NASA site for the photo (like the one on the right) is the best choice. Because NASA is a government agency, its work is automatically in the public domain. The student will find hundreds of high resolution, free images that can be incorporated into any project without asking for permission. All she needs to do is provide attribution and documentation for the source. Likewise, if the student is creating a video and needs a clip of the planet, she can find everything she needs on the NASA Videos site. If anything, she will have difficulty choosing among the many options.

To encourage students to take advantage of the benefits of using public domain resources, I created a one-page overview of the basic details of what I see as the three most important questions people tend to have. I used the same model I did for previous resources on why you should use documentation and what needs to be documented. As in the past, I created the page below (shown as an image) on “Using Public Domain Assets.” The page is also available as a Google Doc or a PDF to provide full accessibility to students.

Using Public Domain Assets in JPG form. Use Google Doc or PDF for accessibility to screen readers

This overview outlines the details that I hope will encourage students to search for public domain resources to use in their projects. Once we have reviewed this information, I would share places to find public domain resources as well as details on how to indicate credit for the creator and document their public domain sources in their projects. I’ll talk about those topics in future posts.

Do you have questions about encouraging students to use public domain materials? Do you have feedback on my one-page overview? I would love to hear from you in a comment below!

Photo credit: Taken with NASA’s Moderate Resolution Imaging Spectroradiometer aboard the Terra satellite.

This post originally published on the Bedford Bits blog.